How to set up Flybook ecommerce tracking with Google Tag Manager and GA4
 By Brian Modena
Setting up Flybook ecommerce tracking in Google Tag Manager
If you’re using Flybook to manage online bookings, getting purchase data into Google Analytics 4 requires a specific GTM configuration that can be a challenge to set up. Out of the box, Flybook’s booking widget loads inside an iframe on your site, which means standard GA4 tracking setups won’t capture completed transactions without some additional work. This guide walks through the exact steps to import a pre-built GTM container, connect it to your Flybook account, and verify that order data, including transaction ID, revenue, and item details, is flowing correctly into your GA4 ecommerce reports. Whether you’re setting this up for the first time or troubleshooting a broken implementation, you’ll have purchase tracking working by the end.
Download the flybook-gtm-container.json here
What you’ll need before you start:
- The
flybook-gtm-container.jsonfile (Get the File Here) - Access to your Google Tag Manager account
- Access to your Google Analytics 4 account
- Access to your Flybook account settings
- Google Chrome browser (required for testing)
Import the container file into GTM
- Log into tagmanager.google.com and open your container
- Click Admin in the top navigation bar
- Under the Container column (right side), click Import Container
- Click Choose container file and select the
flybook-gtm-container.jsonfile - Under “Choose workspace,” select Existing and choose Default Workspace
- Under “Choose an import option,” select Merge (not Overwrite)
- Review the summary screen showing what will be added, then click Confirm
Enter your GA4 Measurement ID
Your GA4 Measurement ID is a code that looks like G-XXXXXXXXXX. This tells GTM which Google Analytics account to send your purchase data to.
To find your Measurement ID:
- Log into analytics.google.com
- Click Admin (gear icon, bottom left)
- Under the Property column, click Data Streams
- Click on your website’s data stream
- Your Measurement ID is shown in the top right, starting with
G-. Copy it.
To enter it in GTM:

- Back in GTM, click Variables in the left sidebar
- Scroll down to the User-Defined Variables section and click Const – GA4 Measurement ID
- Replace
G-XXXXXXXXXXwith the ID you just copied - Click Save
Add your GTM container ID to Flybook
This step connects Flybook’s booking system to your GTM account so that purchase data can flow through.
To find your GTM container ID:
- It’s visible in the top right of your GTM dashboard, formatted like
GTM-XXXXXXX
To add it in Flybook:
- Log into your Flybook account
- Go to your account settings and find the Web Integration or Analytics section
- Paste your GTM container ID into the Google Tag Manager field and save
Enable ecommerce reporting in GA4
- In Google Analytics, click Admin (gear icon, bottom left)
- Under the Property column, click Data Display, then Events
- Find
purchasein the list and make sure it’s toggled on as a Key event - Go back to Data Display and click eCommerce
- Make sure ecommerce reporting is turned on
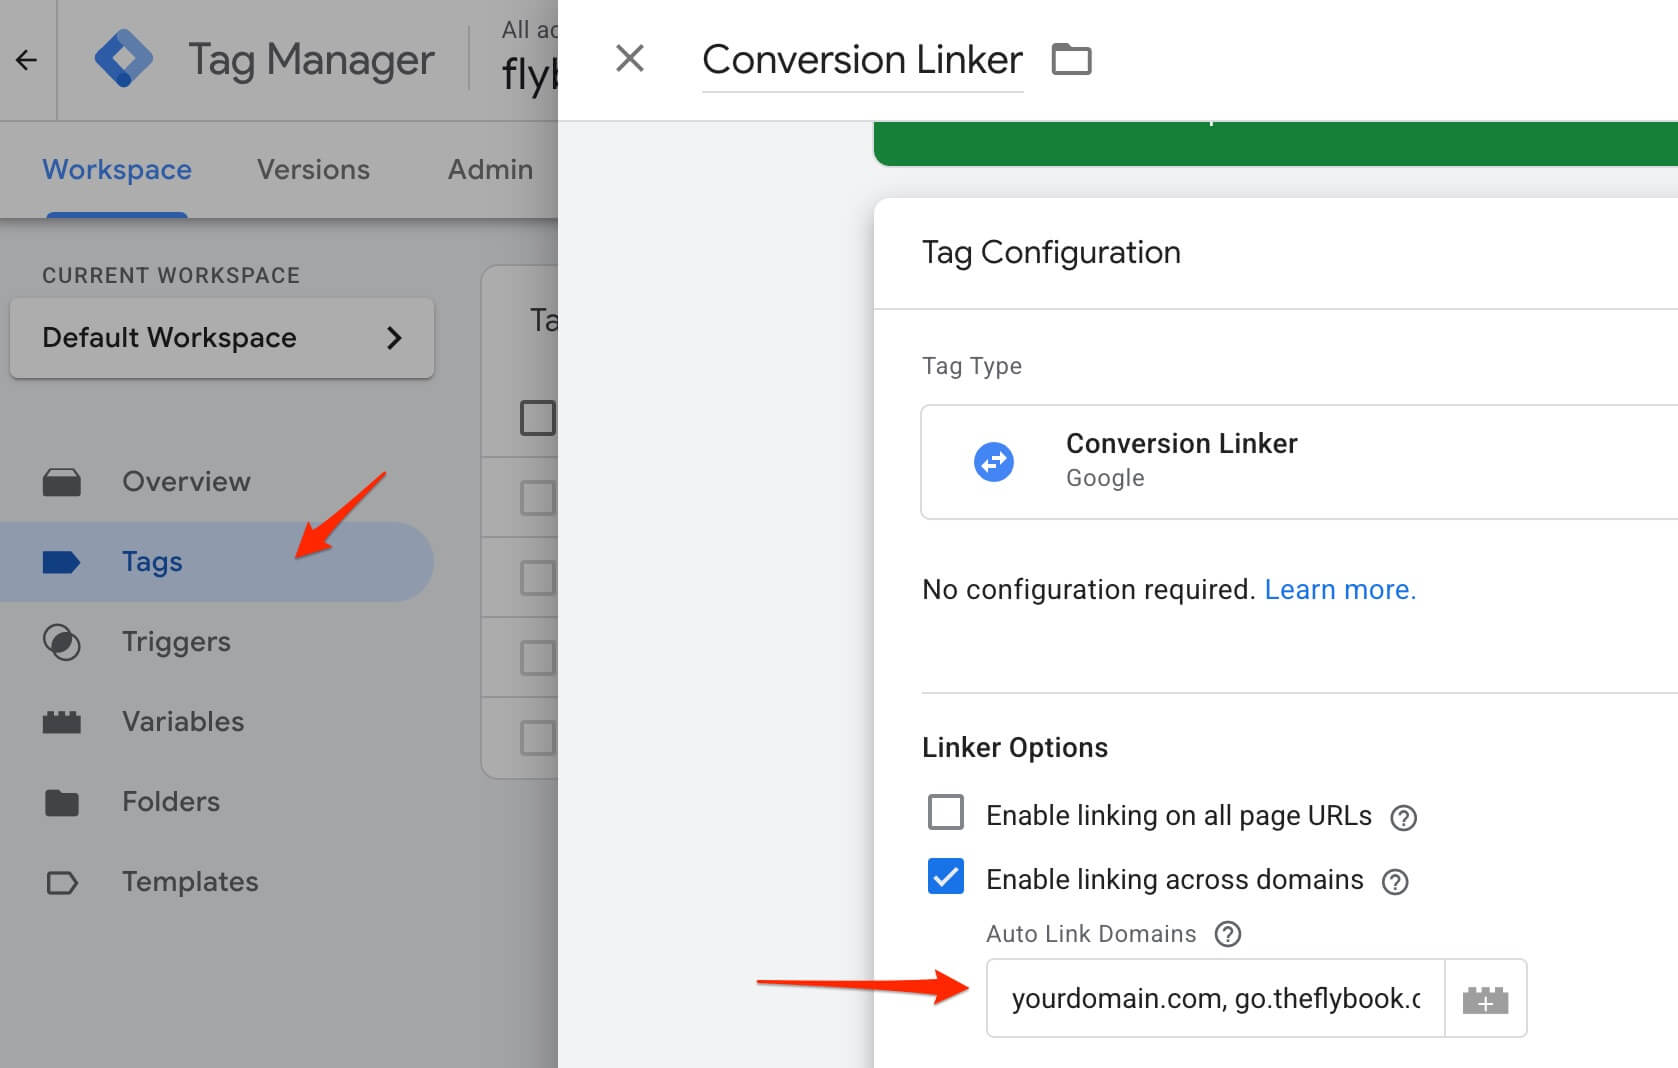
Set up the Conversion Linker tag in GTM
The container you imported in Step 1 already includes a Conversion Linker tag. This is the GTM tag responsible for decorating links with the _gl parameter that makes cross-domain tracking work. The GA4 admin setting in the next step tells GA4 which domains to accept that parameter from, but this tag is what generates it in the first place. Both are required.
You don’t need to create this tag manually, but you do need to confirm one setting after import:
- In GTM, click Tags in the left sidebar
- Find and click the tag named Conversion Linker
- Under Linker Options, confirm Enable linking across domains is checked
- In the Auto Link Domains field, confirm both your own domain (e.g.,
yourdomain.com) andgo.theflybook.comare listed, separated by a comma. The import pre-fillsgo.theflybook.combut you must replace theyourdomain.complaceholder with your actual domain before publishing - Confirm Accept incoming linker parameters is checked
- Click Save if you made any changes, otherwise click Cancel
Set up cross-domain tracking in GA4
When a customer clicks through your booking widget, they move from your website to Flybook’s booking system at go.theflybook.com. Without cross-domain tracking, GA4 treats this as a brand new session from an unknown source, which breaks attribution and inflates your session counts. This step tells GA4 to treat your site and the Flybook booking domain as one continuous session.
- In Google Analytics, click Admin (gear icon, bottom left)
- Under the Property column, click Data Streams
- Click on your website’s data stream
- Scroll down and click Configure tag settings
- Click Configure your domains
- Click Add condition
- Set the match type to Contains and enter your own domain (e.g.,
yourdomain.com) - Click Add condition again
- Set the match type to Contains and enter
go.theflybook.com - Click Save
Test everything using GTM Preview mode
Before going live, verify that the tags are firing correctly on a test booking. This does not send any real data to GA4 yet.
Setup:
- Install the Tag Assistant Companion extension in Chrome if you haven’t already
- In GTM, click the Preview button in the top right
- Enter the URL of the page on your website where your Flybook booking widget is embedded and click Connect
- A new browser tab will open with your website and the Tag Assistant panel running
Run a test booking:
- Go through your booking process all the way to the order confirmation screen
- Switch back to the Tag Assistant tab
What you should see:
- An event called
orderMadeGa4appears in the left-hand event list - Click on it, then look at the Tags panel on the right
- Both GA4 – Clear Ecommerce Object and GA4 – Event – Purchase (Flybook) should show a green Fired status
Verify the purchase data looks correct
While still in the Tag Assistant panel with your test booking event selected:
- Click on the GA4 – Event – Purchase (Flybook) tag
- Expand the tag details
- Confirm the following fields are populated with real data from your test order:
transaction_id— a unique order IDvalue— the order total (e.g.,84)currency— should showUSDitems— should show the activity/product that was booked
If any of these are blank or missing, the booking may not have fully completed to the confirmation screen during testing.
Publish your changes
- Click Submit in the top right of GTM
- Add a version name like “Flybook ecommerce tracking” for your records
- Click Publish
Your tracking is now live. Completed bookings through Flybook will begin appearing in your GA4 reports under Reports > Monetization > Ecommerce purchases within 24–48 hours.